Before anything else here are a couple of useful links regarding LEDs
http://www.kpsec.freeuk.com/components/led.htm
http://www.free-circuit-diagrams.com/light-led/page-1/
And an online LED setup calculator.
http://led.linear1.org/led.wiz
Also, take note that when using button batteries, you won't really need resistors for your LED circuits. There is plenty of confusion out there that insists on having resistors when doing LED mods. While having a resistor is ideal, it's not a requirement for low power sources. Button-sized batteries are rated at 1.4~3.4 volts and have a current capacity of about 30 to 500 milliamps depending on the type and size. Since the objective here is to make the set up as compact as possible, you won't be using larger batteries that have higher ratings to light up a single 1.5 V LED, hence no need for limiting resistors.
Take note that anything electrical or electronic, there are always three things to consider: Power, Voltage and Current. At the same rated voltage, say 3 volts, the bigger batteries are, the more power they store, the more current they supply. So, you'll need a resistor setup to limit the current being supplied to the LEDs if you plan to use batteries other than button types.
I will be constantly updating this guide with new information and additional pictures.
-----------------------
First and foremost, You'll need to paint the crystal with black, except the eyes, of course.
LED fittings are different with every kit, owing to the fact that the head internals are not consistent between kits. I've decided not to put LEDs on my F91, mainly because there isn't any space to fit it in unless I remove a large chunk of the head assembly which I wasn't willing to do. I was also going to put one on my Noir, but later decided against it (katam). So far, I have modded the Wing Zero vKa and the Red Astray, the Impaler, the Zeta and the Crossbones.
So, the bigger and more space in the head, the better. How the internals of the head is assembled also affects how the LED will be placed.
MG Full Cloth Crossbones
The ideal LED to use is the 3mm (smallest) green. If you can find a rectangular LED, so much the better, since you will only need minor mods on it. If not, the round LED can be carefully reshaped into a rectangular form with the flat stone bit attached to the router.
![[image]](https://lh3.googleusercontent.com/blogger_img_proxy/AEn0k_sLa8CovrnF_OK_ChXtCOB188k5OigJFZLKju1zFjLyRx5d14wpU94gNZ81gE-3n5Uy0Xjnw7rJulUKFDp5go23JnG7YpFGc2Wqwjg3AVxucqotGkHfpXYpAtFx1fxWDdFmtwQd2Q=s0-d)
The Xbones was a challenge (as well as the others), because it also had a very small head with no space to put the LED. The socket is also part of the head assembly (as this jit has no polycaps at all). So I had to cut off a few sections to fit the LED.
This is the side where the face plate attaches to. The yellow paint is to help brighten the LED (despite the LED being unidirectional, there is still light that leaks from the sides). Depending on the internals, you might also need to paint the insides of the helmet black. That green part in the middle is the front of the LED.
This is the side where the face plate attaches to. The yellow paint is to help brighten the LED (despite the LED being unidirectional, there is still light that leaks from the sides). Depending on the internals, you might also need to paint the insides of the helmet black. That green part in the middle is the front of the LED.
![[image]](https://lh3.googleusercontent.com/blogger_img_proxy/AEn0k_s-f5yM21wTQm-A72TbFXYU7GyLXeYzEGR1PrA2Xz_jTR6l9kK6bHYeaLo6liZXswP-1ge3U0f_XIed4-_Fk6EzZNNQZrWHB_TJnF4cQbXYX0RWpYMq1aYxMWTL4tlA4tVB36kX=s0-d)
Back view of the assembly. As I mentioned, the wires are clamped with the LED legs.
![[image]](https://lh3.googleusercontent.com/blogger_img_proxy/AEn0k_t-d4v7lAKJm-vfhxcJffBxdcdxNYuieSoutBUqlkVYYrJBKwQiHMcRd0zTSAiGyurTi00ub1LGmKsEvU9h0LhzeSMbqg7VlUTB8K4VHJ_vCKk5tUNPlOKC7bmiL36A1nA88T0awA=s0-d)
A view from underneath showing the socket. The faceplate actually completes the socket assembly.
![[image]](https://lh3.googleusercontent.com/blogger_img_proxy/AEn0k_tZeSOPR0crPhHEvjd0dhKW2LLZYIpZzD942EGbibDjJcc4CEm4fRHmiQVc2O0odtspsxl2-xZBgg-fv4J2kZpW702eWsIujsUKcDJXd_6l0i06xfVycXF6Bsrn2gGd32hxiacLEA=s0-d)
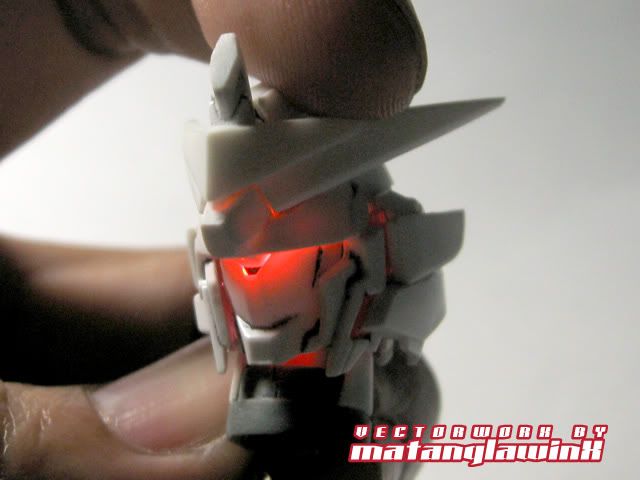
With the battery connected, to demonstrate that it does work.
Some bozo in a non-Gunpla forum actually insinuated that I only added the lighted eyes effect via Photoshop.
Some bozo in a non-Gunpla forum actually insinuated that I only added the lighted eyes effect via Photoshop.
![[image]](https://lh3.googleusercontent.com/blogger_img_proxy/AEn0k_trI4CgwV7mk6U5DZWkPzuMxYH5T-LQqn0bPK79OOZKB9SGNKm1Mgzs2CuaIlXlnpxTu4GSrK460NjQVEoD8poPLE9zy50f9WOYxqQwOV0aSBOJz_aeEqly05AVb2kzOd1A9qTm2w=s0-d)
And a much closer look.
![[image]](https://lh3.googleusercontent.com/blogger_img_proxy/AEn0k_uI99iLByIykKnu1tm1RSJBRAd7Xle-IjBLdi2lb_oK-3h6BeveZJi9Wz8HB1q7kKPJHGNngCBI9k38GE_vp6TN2_g3fl9GzAkNv4598bArcMcsy-h3g98XWmLlig7_wrZgH2AjSA=s0-d)
For powering this, I used a heavily drained 9V battery (from my guitar). NEVER use a new 9V battery since it will burn the LED. Although LEDs last a long time (most are rated at 2-3V), they are not made to handle both high voltages and current. Ideally you should use 2-3 button-sized batteries.
NG 00 Gundam
Some kits are easy to modify for LED insertion, like the NG 00.
![[image]](https://lh3.googleusercontent.com/blogger_img_proxy/AEn0k_vm9je67IfC2GrMVC-4gH0Z5ZgxF6e8rPKT8buE9ydiHpB8Zyxf02MtrUKLi3eCWAGEJz4anxQ3mG-NuTI6Sip8IHXG0SBjbQhp9gr9hTQTvvg5NA1oHg_1gn25AKoejdCFoeGo=s0-d)
![[image]](https://lh3.googleusercontent.com/blogger_img_proxy/AEn0k_vkOXWC8I24Hh9juXzM26f9oyQhfrM7_lQZWL0IaiSYfLyb_XxkL3YabAeaVNeSd97yfOdNs64UGpwJdqYg4fMMV-bgG-IP5hVZ-KSjRcfl1utxIiOWP0n9b3xc94zSaok3eEkY=s0-d)
![[image]](https://lh3.googleusercontent.com/blogger_img_proxy/AEn0k_uaNG89zNspJX6Hs6eV4yfGkzHNpk7WUYdAOY7dEPil5wjJt10nvTuk5rUTmvKjM9tp-kdX6dillbOsqZmL6CNgCp9uGJ-Re3cZZtVi5mJr9BYC9OFoQfEDKTKRzfxZO4iz5PRp=s0-d)
![[image]](https://lh3.googleusercontent.com/blogger_img_proxy/AEn0k_uf1n7ggI-fD9yMkvE1s0sy_u736mZLlvr_tttbBtBHzHIZzKjP6kM-htCo2cTvh9xdcQYBO0AocO07p7ujBR9qggxH9ouWLJDXbB_pKjI3ZNoz1wO9PFr1izuldQhxhr7pmNw=s0-d)
MG Hi-Nu (Solderless Connections)
I got those Kotobukiya Spring units in various diameters, and as I was modding a few parts withe the springs, I realized that it could make good conductors instead of using wires. So I tried fastening a 1mm spring to an LED, and it hugs the contact like a charm.
![[image]](http://s20.photobucket.com/albums/b209/ibanag/Gundam/?action=view¤t=IMG_1223.jpg)
![[image]](http://s20.photobucket.com/albums/b209/ibanag/Gundam/?action=view¤t=IMG_1224.jpg)
![[image]](http://s20.photobucket.com/albums/b209/ibanag/Gundam/?action=view¤t=IMG_1203.jpg)
![[image]](http://s20.photobucket.com/albums/b209/ibanag/Gundam/?action=view¤t=IMG_1254.jpg)
The Ice Queen Palace Athene
This is a fairly simple mod for the Palace Athene. The pictures say it all...
![[image]](https://lh3.googleusercontent.com/blogger_img_proxy/AEn0k_vrxeXrTF6beCuknmotVYiD8-1TrAZJLq8x5a0_jGENyn6RYSCB7-zK6oYQC6Lju6t_dLaZ9w-AxbnBXnL5wDoNJKwK3oAux39pyKvFp20jFdu15f1Ez13drfZaxUm-QoZbzIV2=s0-d)
![[image]](https://lh3.googleusercontent.com/blogger_img_proxy/AEn0k_sV7pRS2oMM58GKuxu3QzWgNKrKVsWtzYanR-D6Lu1AAzaByOFEcDP1NdW4Ef5YyJqLzExHjx0inQk5kx4G21scvimn5lnNTBCNsZRBtSRuXnhcozHstpjZPPM2u_EXFwPfZle7=s0-d)
![[image]](https://lh3.googleusercontent.com/blogger_img_proxy/AEn0k_slW6ISLNfV0Ha6x8RSazoaAK81f10G82WKbk2Ep1rZXqZawAKcizqq4N55eZTByxrtBp657kQc4wqG7a58ZZ_FZG2gHjCkZKW1Mcg458Pa8j07ZfLwYCxqlUKj7IsvXmQY9N5S=s0-d)
![[image]](https://lh3.googleusercontent.com/blogger_img_proxy/AEn0k_seKXwVgIbtDtL1wnTfec7ZYMiTQshG93dnjYVNK-bsWQgMzHF4FDQrYwP1TPo4vPFBSQZZwOsdBAw0blU5IV7UqMjcuFEh56LSDUpyA-IWmPN08v7KKQ_VY0qGfJYLPGTvAjRV=s0-d)
MG Gundam Wing vKa
I successfully installed an LED in my Wing vKa without modifying anything but the LED.
Here are pics of the modification. I've done this a year ago, back when I still did no actual modifications to the kit (except blackening the insides to prevent light bleeding or leaking). The Wing vKa's head may be a tad small, but the cavity is big enough for a shaved 3mm LED. Right now, the LED is simply glued to the polycap, but since this will be the kit I'm including in the Wing Group Build, I'll be modifying a permanent casing for it, and maybe make the mask or the crown removable so I can easily access the LED.
Here are pics of the modification. I've done this a year ago, back when I still did no actual modifications to the kit (except blackening the insides to prevent light bleeding or leaking). The Wing vKa's head may be a tad small, but the cavity is big enough for a shaved 3mm LED. Right now, the LED is simply glued to the polycap, but since this will be the kit I'm including in the Wing Group Build, I'll be modifying a permanent casing for it, and maybe make the mask or the crown removable so I can easily access the LED.
![[image]](https://lh3.googleusercontent.com/blogger_img_proxy/AEn0k_vefOXsCyyc1ViQ9ILpLnNVfBpGr9c_sypAgVQivvbxolLJUoBU9GG1xyPZz7YdNf_MAbXtvcelcjogkGKKbkw3fIedwBIdHdtifKf3anh2Z0BQ24x6bPpi-YhZZfKWAeRjUsjc=s0-d)
![[image]](https://lh3.googleusercontent.com/blogger_img_proxy/AEn0k_svP6fH6gdf8i9pbqRpAH0mSF3TEr57kfR2stiYahStpzKUv2PUjhUwBgWagLYdN3E6X4yaBUhbfuh0U_esWQcX3V5ca1wUfDBd0MFj6jB10JWJzHO3Ho31kQVFuM8cHPGmdr0L=s0-d)
The PG Ronin Astray
The stock LED mount of the PG Astray. After much consideration, I realized green is an inappropriate color for the Ronin build aside from the fact that the stock LED is rather weak. I also tried replacing the stock LED with a superbright white, but, the single LED makes it look as if the Ronin is cross-eyed (even with the stock), so, I'm customizing a dual LED mount for it. It will be powered externally via a custom backpack Update: I've managed to use the mid-section armor of the waist as the power pack, hence eliminating the need to disassemble the back of the Ronin's head just to turn the power on or off.
![[image]](https://lh3.googleusercontent.com/blogger_img_proxy/AEn0k_vUbedNXEeAH7IISNgjFelftVC2kpiBwUuYTp9oLpHfRpgsGo8xBKaNL3zFAiabQ9lUk5NtN10cYYN212A4ODyvZtulP-ZU2AKy_IYB6c3rfl_j6JoaWIgi0R55vIZ7kguQC9w=s0-d)
For a clean, solder-less connection, I used 1.0mm Kotobukiya springs to connect the LEDs in series, which will need two CR2016/2032 batteries (for a total of 6V, same current supply). I could have connected the two in parallel using only one battery, but, I realized that the power drain would be too much for a single battery to handle. LEDs shouldn't be powered beyond their rated voltage, but since the LEDs are in series (hence, their combined rated voltage is also 6V), it wouldn't really pose too much of a problem.
![[image]](https://lh3.googleusercontent.com/blogger_img_proxy/AEn0k_tzFza1u1MQuJaCbYpevAN2uWbbuCH8IwjdDjJgqb6KxfcLT8kWcV8uGDXW_geC8riXmgqK0TinmAP24sZLxmiYA1uGHAzQfK0_Cd_MOaUDS_6sPaxKKuhQy-3-IdosVkN6VoVa=s0-d)
Test fit.
![[image]](https://lh3.googleusercontent.com/blogger_img_proxy/AEn0k_tBUFUdfmcn2q0y1hFlq-jzSGbHiDgQ4CGlH3j6GYeBCvdRKdCD2ZwmGa7GW0hUHkuhsKuu6m6eiwfjKwRCz77YwmH03qHeuvv6xqLAFWRm8JKe_REcu0TrLljA2ry0By1zxls=s0-d)
This is the middle section of the waist, and I've modified it as the
battery pack for the Ronin's LED eyes.


The
wiring is rather simple; I've hidden the spring wire contacts (I used
1.0 mm wave springs, which are more resilient to corrosion as compared
Kotobukiya springs) inside the neck, then through the back armor to
which the backpack is mounted on. The battery pack connects directly to
the holes on top of the midsection, wherein small steel pipes serve as
contacts. There is no switch; I'll simply insert the respective LED
contacts into the pipes and viola!
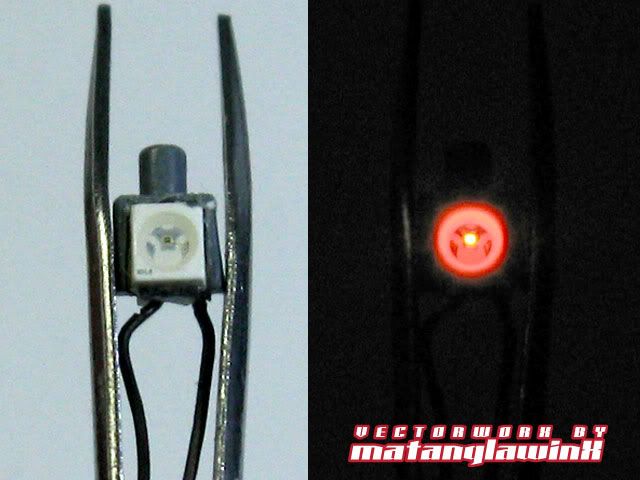
Surface Mount LEDS. These are nice for small heads, but in most cases require soldering (which I try to avoid). This one in particular, a 1x2mm (which I procured from a cellphone repair shop) was fitted inside the Impaler,


and this one, which I bought at Baclaran, into the Chimera.

Strange enough, the eyes of the Unicorn are cut from the H-runner which
is made of ABS, and thus prevent any "easy" LED modifications to be
made. I wasn't planning on using the Destroy mode's face anyways so it
wasn't much of an issue. With that I opted to give the Chimera a
monoeye LED.
The
modification is rather a simple one. I used a 1X2 surface mount LED,
this one had rather small contact points that I crimped a little to be
able to mount the 0.5mm koto springs I used for contact points.
I
wanted a Red Monoeye, but the only color available with that size is
green, so I cut a piece of transparent red runner, shaped it to fit the
internal mask assembly and glued it directly over the LED. The
resulting color was a bright orange, so I hand painted it with several
coats Tamiya Clear Red (with 30 minutes of drying time in between for
maximum adherence) and top coated it with Semco clear acrylic.
The result is actually very favorable. Will fix the light leaks, of course, as soon as I start painting.
These are
2X2 SMTs (simply called 1210s), but unlike the 1X2s, these nifty little
buggers have wider contact points that wrap around the side and the
back, providing a larger contact area for soldering. They come in
Green, Amber (yellow) and Bright Red.

Though I was already quite
determined NOT to solder anything, this one was rather easy to solder
wires on to. Also, the LED face itself has a nice "cryptic symbol" that
reminds me of the Transformers and is visible when lit.
I've modified the Sinanju's Mono-Eye attachment to fit the LED module by carving out enough material to fit the module.


23 comments:
If the gundam that I want to install LED on to it where the eyes are not hollow, can I carve 2 holes matching the eyes shape? but what do I use to replace the eyes when i do not on the LED
I'm guessing you're doing this for a 1/144 HGs or 1/100 NGs without clear/crystal eyes.
You can either use transparent plaplates, or reshape clear runners into the shape of the eye.
i am doin it on a SD gundam becoz this is the 1st time modifying so i dowan to try it on a PG-.-".. hmm the transparent plaplate cant fit the yes of SD gundam=(..
You night need to put a little ekvow grease on and do a bit of cutting and reshaping to fit those eyes.
what is a ekvow grease? sorry really new to this=(
Pardon the typo. It should have said "elbow grease" which is a metaphor for "more effort" or "work harder."
Hope that clears it.
ohhh=D haha thanks! i will put in more effort and do wat I can! I hope I can be as good as you=D though tat is really close to impossible haha.
Hi how do you connect the springs to the wires/LEDs etc?
I insert the LED contact into the center of the spring. The fit must be snug so that the spring's natural tension "bites" into the contact.
can you show me a detailed pic please? I really wanna learn how to do it
Thanks
Cheers
The Ronin LED mod shows how it was done.
http://i20.photobucket.com/albums/b209/ibanag/Gundam/IMG_2220.jpg
whats the size of the spring that u used to make LED bite on the spring
1.0 mm. Please do READ the entire tutorial before asking questions. Some of what you asked have either been answered, or can be deduced from the descriptions and pictures.
sorry, i prob missed that part, scrolled too fast, btw how did you use the springs to attach to the Surface Mount? can you show me or do a tutorial?
Thanks
It's a one time thing. That surface mount came from an old cellphone, and those had little contact points that the springs were able to "bite" into. For that small a contact point, soldering is still recommended as I have done with the Angelus monoeye.
Hi MATX!! Are you from Manila? Where can I get the spring that you use? I really hope you can help. i want to finish my Hi Nu so badly. Please help!
you can order those springs from M1gs,
http://www.facebook.com/migsnoel
http://www.facebook.com/pages/M1gs-Gundams-hobby-toolskits-For-Sale/112320065486337
I'd also like to ask how long the setup usually lasts before I have to replace the battery?
It seems such a shame to have to keep changing the battery all the time.
Thanks!
Batteries do drain over time. If you have just a small load, like one LED, your battery should last long, so as long as you light it only as needed. In the 2011 GBWC, I left the Ronin's LEDs running overnight, since I had to turn them on for judging and simply left them on, until the day after.
ni ce
I think he mean to say elbow grease
I think he means elbow grease
can you please give instruction how to reshape round led
Post a Comment