Saturday, February 6, 2021

Gunpla™ and Modeling Terminologies


About Kits and Building
  • Kit: That would be what you are building, what will drain your wallet, what will make your Mom/GF/BF/Wife/Husband angry at you (depending on the situation) and will ultimately make you happy.
  • Kit Variant: A recolor or "special" edition of a pre-released kit.
  • P-Bandai: Limited edition kit variants which can only be purchased online through Bandai Hobby Shop, but also through online sellers.
  • Builder: That would be you, the builder of kits.
  • Part: The actual part of the kit used in the build, indicated on the Runner.
  • Runners: The grid of plastic that holds the Parts of the kit.
  • Trees: Same as Runners
  • Sprue: The leftover channel where plastic is injected and expelled (also, Riser).
  • Nubs: The small leftover “lumps” when the Part is cut from the Runner/Gate. Nubs can be thin or thick depending on the Gates it’s connected to.
  • Nubmarks: A mark left after cleaning the Nubs.
  • Gates: The point where the Runner meets the Part of the kit (the entry point of the plastic into the part. In Bandai kits, this is marked with a small arrow, which indicates where one should cut first.
  • Undergate: Gates located under the Part instead of on the side or detail surface.
  • PlaMo: Stands for Plastic Models and refers to plastic model kits for different genres.
  • GunPla®: Stands for Gundam™ Plastic and refers specifically to Gundam Plastic model kits.
  • Resin Kit: A kit made of Resin.
  • Resin Conversion: A type of Resin Kit that uses Resin pieces to convert an existing unit to either an upgraded one or a completely different unit.
  • OOTB: Stands for Out Of The Box. Building a kit as is with no modifications.
  • OOBB: Stands for Out of Box Build. Same as OOTB.
  • Straight Build: Same as OOTB.
  • Kitbash: Combining parts from different kits to make one unique kit.
  • Mods/Modifications: Altering a part for fitting or to change it into something else.
  • Scratchbuild: Completely building a part for a kit (or building a whole MS) from scratch using various materials.
  • Clamshell: Describes two, often mirror parts that are connected together to make a single part, i.e. shoulder sections. A clamshell can be separate parts or two parts of a single mold.
  • Flash Line: Excess plastic excreting from the adjoining edges of a clamshell mold.
  • Seam/Seam Line: The gap between two adjoining parts.
  • Polycaps: Intermediary parts that are made with polyethylene (PE) plastic. These are semi-flexible and are usually used to connect joint sections.
  • Decals: Add-on details that are either paper, foil or clear plastic sticker, dry-rub, or water slide decals. Most kits come with sticker decals, but some come with dry-rub and/or water slides.
  • WIP: Stands for Work In Progress. This would be what a Builder is currently working on.
Kit Types Based on Grade/Scale
  • SD - Super Deformed.
  • SG - 1/200 Speed Grade. These kits are molded in white plastic and comes pre-painted and decaled (limited articulation and poseability).
  • EG - Entry Grade. These kits are molded in 3 colors with no polycaps.
  • FG - 1/144 Stands for First Grade molded in a single color with no polycaps (no articulated elbows and knees, limited poseability).
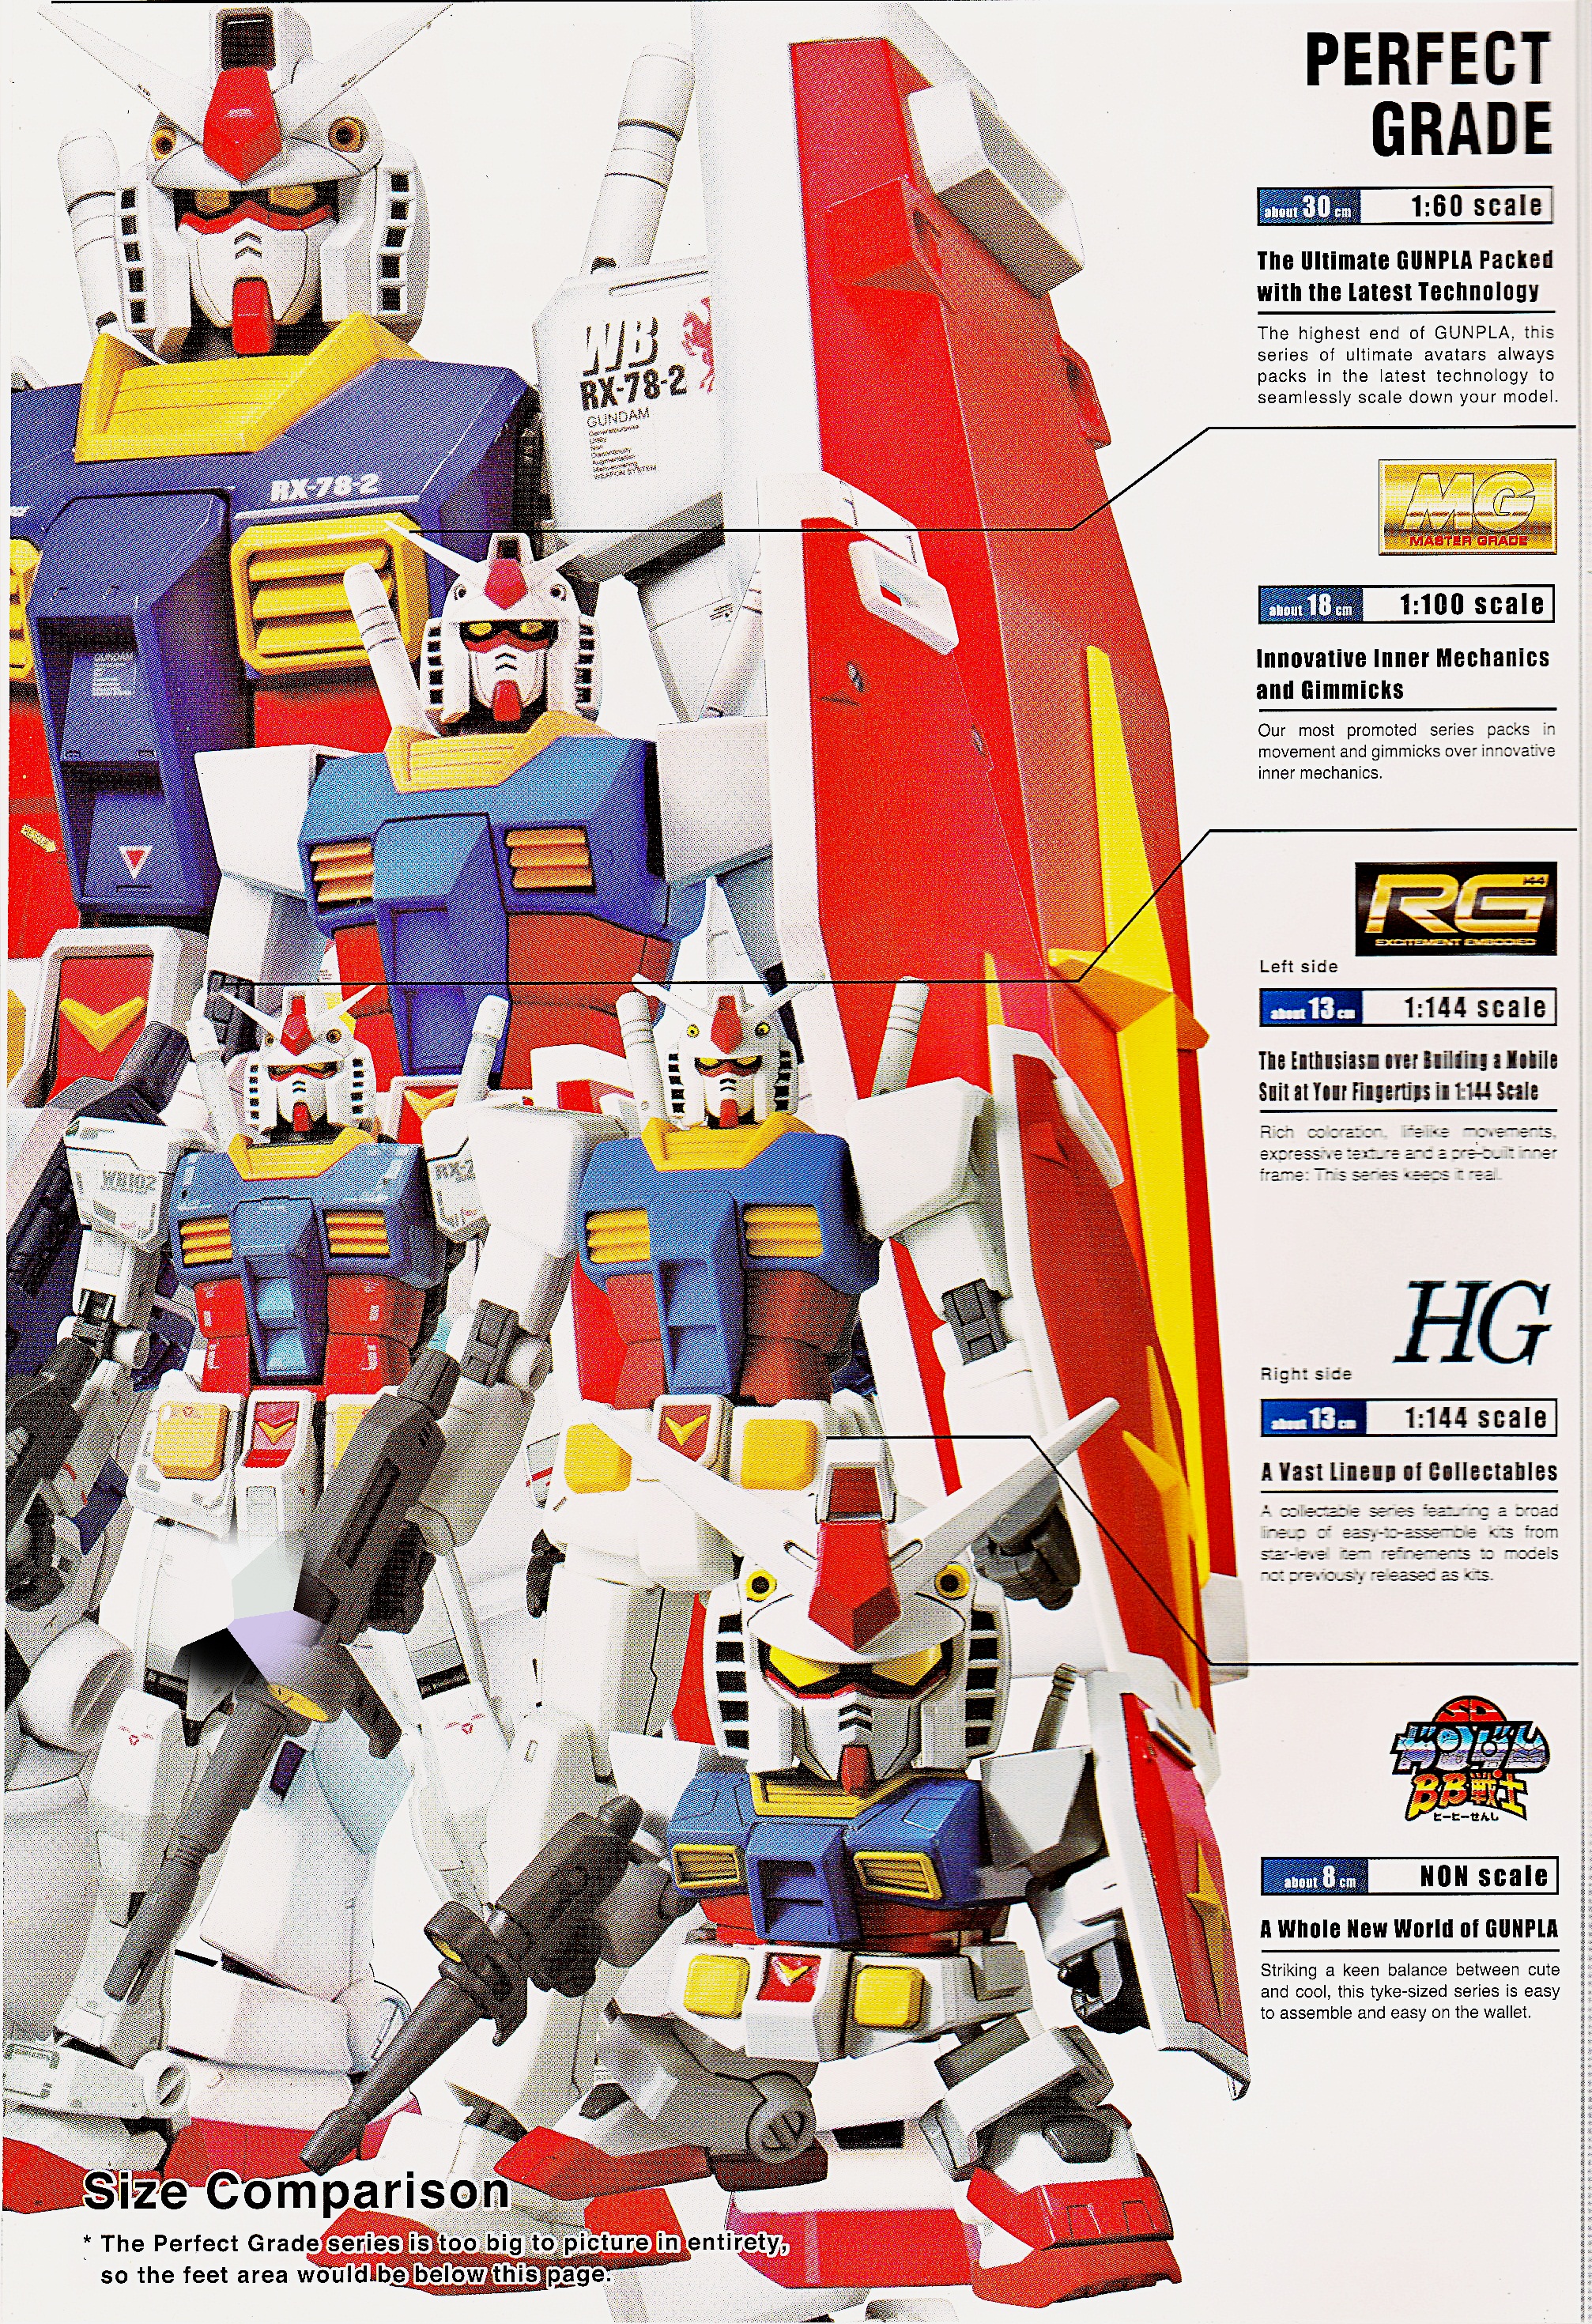
  • HG - 1/144 Stands for High Grade (Improved articulation and detail).
  • RG - 1/144 Stands for Real Grade (full-frame, small scale, detail and parts separation).
  • NG - 1/100 Stands for No Grade (user appended, technically, non-UC HGs in 1/100 scale).
  • FM - 1/100 Stands for Full Mechanics. Detailed and framed kits that began with the 1/100 Iron-Blooded Orphans series.
  • RE/100 - 1/100 Stands for Reborn. These are 1/100, non-framed, fully-detailed kits from the UC line.
  • MG - 1/100 Stands for Master Grade. Most modern MGs have full inner frames separate from the armor, while some older MGs only have torso core frames.
  • HiRM - 1/100 High Resolution Model. This is a hybrid kit that comes in pre-assembled Die cast Metal and plastic composite frame and armor parts in runners.
  • MB - 1/100 Stands for Metal Build, a line of metal and plastic (PVC) composite figures. Some MB kits have extra pre-cut parts for assembly.
  • GFF-MC - 1/100 Stands for Gundam Fix Figuration Metal Composite, a line of of metal and plastic (PVC) composite figures which are similar if not the same as and precursors of MBs.
  • PG - 1/60 Stands for Perfect Grade (full articulation and parts separation).
  • MS - 1/60 Stands for Metal Structure figure.
  • verKa - a series of kits designed from ground up, including engineering of the kits to the creatives for packaging and manual design by Hajime Katoki. They are packaged in signature white boxes
Plastic Types
  • PVC: Stands for polyvinyl chloride. A type of plastic used in certain Gunpla kits and figures.
  • PE: Stands for polyethylene. A type of plastic used in polycaps.
  • PS: Stands for polystyrene. A type of plastic used in Gunpla kits. Used mostly in armor pieces. Some HG are all PS.
  • PP - Stands for polypropylene. A type of plastic used in Gunpla kits similar to PE but stiffer and denser, used in combination with ABS in manipulators and joints (in RGs, PGs and v3.0 manipulators).
  • ABS: Stands for acrylonitrile butadiene styrene. A type of plastic used in GunPla kits. Used mostly in MG/PG frames and in some HG pseudo frames, ABS is a tough but flexible plastic. Sensitivity to cement varies depending on the color of the ABS, with black being the toughest, and red the most receptive to cement.
  • Resin: A type of material used on some non-plastic kits.
  • TPE: Stands for Thermoplastic Elastomer. This is the rubbery plastic in some older MGs (like the rubber hands and feet of G-Gundam kits) and the wing tips of the PG Wing Zero Custom.
Painting
  • Airbrush: A paint application tool.
  • AB: Stands for Airbrush
  • Hand Paint: Applying paint by hand with brushes.
  • Hand Brush: Same as Hand Paint.
  • Spraycan: Canned pressurized paint with a nozzle that serves as the applicator.
  • Rattlecan: Another term for Spraycans.
  • Decant: The process of expelling air, then the paint, from rattlecans for later use in AB.
  • Primer: A chemical used to prepare a surface to be painted. Not to be confused as a type of Paint. Primer is (slightly) chemically different to regular paint. Can also mean the application of a coat of Primer (prime).
  • Paint: A chemical used on surfaces to give it color.
  • Acrylic: A type of Paint. Weakest of the three main Paint types. Most acrylics are water-based and can be thinned by plain water, but, becomes water-resistant when dry/cured.
  • Enamel: A type of Paint. Middle ground when it comes to Paint types. Enamels can be thinned by enamel thinners.
  • Lacquer: A Type of Paint or Thinner. Strongest among the three Paint types. Lacquer is basically varnish mixed with colors. Lacquer can be combined with Acrylic bases, and can be thinned or stripped with alcohol.
  • Thinner: A chemical used for Thinning or Reducing paint.
  • Thinning: Adding Thinner to Paint to make it more fluid/less viscous.
  • Retarder: A chemical added to Paint to slow down its drying time, giving it a chance to settle down and self-level. Usually used on Acrylics and replaces Thinner.
  • Top Coat: A clear, colorless type of Paint used to seal and protect Paint layers.
  • Flat: A type of Paint or Top Coat or finish that is not shiny or glossy.
  • Matte/Satin: A finish midway between flat and glossy.
  • Gloss: A type of Paint or Top Coat or paint finish that is shiny or glossy.
  • Semi-Gloss: Same or similar to Matte.
  • Future: A type of glossy floor coat used as acrylic top coat that can be applied by Hand Brushing or with an AB.
  • Base/Buffer Coat: The first Layer of paint. Applied after Primer if Primer is used. Used to set the tone of the Color Coat. Can be skipped by using the corresponding Primer color.
  • Color Coat: The coat of paint that the will be the surface’s final color.
  • Candy Tone: A technique of using a clear paint over a metallic buffer.
  • Pooling: Paint collecting in a certain spot mostly on the edges and panel details, usually from a very thick coat of paint, or from Runs.
  • Runs: Paint that is flowing on the surface, usually due a thick coat of paint and pulled by gravity and collects in Pools.
  • Brushstroke: The direction a paint brush is going. Can also mean the same as Brush marks.
  • Brush marks: Fine lines left by brushes after every stroke.
  • Autolevel: A Paint property where the Paint makes itself smooth and level on its own as it dries.
  • Leveler: A chemical added to paint to make paint level and smooth as it dries.
  • Retarder: a chemical additive that delays the drying of paint to allow it to settle and level properly.
  • Overspray: Excess paint that accumulates (in details, edges and panel lines) because of too close a spray distance or too much pressure.
  • Misting: a technique employed in AB and spraycan painting where parts are coated with paint mist over a significant distance. Paint build up is slow, but more even, requiring more than just the usual number of coats compared to the closer distance. Ideal for spraycan painting.
  • Masking: The process of covering certain sections of parts with masking tape or masking solution to shield a previous layer of paint from a new layer of a different color, to create color separation.
  • Orange Peel: The results when spraying too much paint or laying down one coat after the other and not allowing the previous coat to fully dry. It can also be caused by uneven or unprimed surfaces This very much looks like how orange skin looks like, with pits and bumps.
  • Bottom-feed: A type of AB where the paint container is at the bottom.
  • Siphon-feed: Same as Bottom-Feed.
  • Gravity-feed: A type of AB where the paint container is at the top.
  • Side-feed: A type of AB where the paint container is at the side.
  • Dual-action: A type of AB trigger where two actions are done to start spraying. First, pressing down on the trigger starts the air flow, while pulling it back on trigger sprays the paint.
  • Single-Action: A type of AB trigger where pressing down on the trigger will release both air and paint.
  • Internal Mix: A type of AB where the mixing of paint and air in done internally.
  • External Mix: A type of AB where the mixing of paint and air in done externally as air is expelled.
  • Comp: Short for Compressor, a machine that provides air for ABs.
  • PSI: Stands for Pounds per Square Inch. the amount of pressure released by a Compressor.
  • Working Pressure: The PSI a Compressor is set to while it is being used.
Tools and Materials
  • Side Cutter/Nipper: A tool used to remove Parts from Runners.
  • Hobby Knife: A multipurpose pointed straight edge blade mounted on a shaft.
  • Markers: Pens used for Panel Lining and Detailing.
  • Sandpaper: Abrasive sheets of various grits used to smooth rough surfaces and remove scratches.
  • Sanding board: A tool that looks like a manicurist’s emery board used for sanding.
  • Sanding sticks: Same as/similar to Sanding boards.
  • Grit: A unit of measure of how rough sandpaper is. The lower the grit, the rougher the sandpaper.
  • Putty: Used in making repairs and filling.
  • Scribing Tool: A tool use for Scribing panel lines. There are specific scribing tools and chisels, but one can use blunted knife blades and compass needle points for scribing.
  • Cement: A type of adhesive used in GunPla building.
  • CA Glue/Superglue: CA stands for Cyano Acrylate, which is a resin-based glue.
  • Dremel/Router: A multipurpose electric hand tool used for cutting, carving, sanding, grinding, and buffing.
  • Pin-Vise: A hand tool used to hold micro drill bits and pins.
  • Plaplates/Polystyrene Sheets: Sheets of plastic with varying thickness used in Scratchbuilding. “Plaplates” is a brand specific to Tamiya.
  • HIPS: Stands for High Impact PolyStyrene. Same as/similar to Plaplates.
Detailing
  • Decals: Detail markings on kits.
  • Waterslide: A type of Decals that needs water to apply and adhere.
  • Rub-On: A type of Decal that is rubbed-on the surface to apply.
  • Sticker: Decals with adhesives
  • Dry Transfer: Same as Rub-On.
  • Panel Line: Lines and groves on the surface and lines where angles meet.
  • Panel Lining: Filling in Panel Lines with color.
Techniques
  • Progressive Sanding: Technique used to remove nubs or make surfaces smooth with sandpaper by increasing sandpaper grit gradually starting from coarse to fine.
  • Buffing: Process of rubbing cured paint (or even bare plastic) to make it smooth and shiny.
  • Rubbing: Same as Buffing
  • Pre-shade: A type of shading technique where shading is added before the Color Coat is applied.
  • Post-shade: A type of shading technique where shading is added after the Color Coat is applied.
  • Wash: An advanced painting technique. Can also be a very thinned mixture of paint and thinner used for various Washing purposes.
  • Panel Line Wash: A type of Wash technique used to paint Panel Lines.
  • Spot Wash: A type of Wash technique used in Weathering.
  • Reverse Wash: An painting technique similar to a Wash but in reverse.
  • Mod: Short for Modifications.
  • Weathering: Applying details and shades to a kit to give it a more realistic look.
  • Scribing: Adding Panel Lines to the surfaces of a kit.
  • Drybrushing: A Painting/Weathering technique.
  • Battle Damage: Adding details on a kit to simulate the look of going through a battle.
  • Plaplating/PS Plating: Armor detailing with pieces of shaped plaplates or HIPS.
Slangs
  • Hiatus: Means to take a break from a certain activity or from work. In GunPla Terms, “Pinipilit umiwas sa tukso” (avoiding all temptation).
  • PNP: Stands for “P**A, nalaglag/nawawala part/polycap!” In English: “Sonnavab***ch/F**K, I lost a part/polycap!” 
  • Blackhole: When a part one is working on slips or flies from one's grip into the unknown, comes right after PNP.
  • Dibs: English slang. Usually means “Akin na yan, ako ang unang nakakita” (It's mine, I saw it first). Muttered when someone offers a kit/set for sale that's too good to pass up.
  • Haul: items purchased (Having All U Like) often in bulk.
  • Backlog: Stash of unbuilt kits
Timelines
  • UC - Universal Century, starts from UC0068 (origins) to UC 0223 (G-Savior)
  • FC - Future Century (G-Gundam)
  • AC -After Colony (Gundam Wing)
  • EW - Endless Waltz (Gundam Wing)
  • MC - Mars Colony (Frozen Teardrop)
  • AW - After War (Gundam X)
  • CC - Correct Century (Turn X)
  • CE - Cosmic Era (SEED/Destiny/Astray)
  • AD - Anno Domini (Gundam 00)
  • AG - Advance Generation (AGE)
  • RC - Regild Century (Reconguista)
  • PD - Post Disaster (Iron Blooded Orphans)
  • BF/BD - Build Fighters / Build Divers. A set of overlapping series that tell stories about Gunpla building and competitions.
Miscellaneous
  • Shiny/Glossy Finish: A surface finish that reflects light. Ideal for showroom or just-out-of-the-factory concepts.
  • Matte Finish: A dull surface finish that reflects little light. Ideal for week/month-old effects and a precursor to weathered/battle-damaged effects.
  • Mirror-like Finish: A surface finish that reflects light and images, mostly achieved with chrome paints.

Wednesday, January 27, 2021

A Guide to Gunpla Scales and Grades

Gunpla “grades" are scale and complexity indicators. You should be able to start building any grade without difficulty, as long as you follow the pictogram instructions. More recent Bandai kits also have English Instructions.

1/144 scale

  • High Grade (HG) which is a relatively simple build, often without any frame and mostly lack details. HGs are the cheapest among the grades, most abundant, available, and the HG line has the widest range of kit designs and variants. Most MS designs are released as HGs. Some HGs have rudimentary "pseudo" frames, like the Sazabi and K'shatriya. The HG series are appended by the anime series Universe, ie, HGUC, HG00, HGAC, etc. The HGIBO is the first line that feature internal frames.
  • Real Grade (RG) has an internal frame like modern MGs. RG frames are mostly pre-assembled in sections and the armor parts are heavily detailed. Only select MS designs (main protagonist and antagonist suits) are released as RGs.
  • Entry Grades (EG) and First Grades (FG) are 1/144 scale kits intended for younger builders for quick building, do not have polycaps, and lack articulation and detail. EGs are molded in 3 colors, while FGs are molded in white PS plastic. The new Entry Grade Gundam RX78-2, however, features better articulation.
  • 1/200 Speed Grade. These are preformed and prepainted kits that come in a single runner.

1/100 scale

  • 1/100 HG is just like the name implies. They are 1/100 scale High Grade kits released in the 90s. The only series released in this scale/grade are the Gundam Wing and Gundam X (afaik).
  • 1/100 Non-Grades (NG) or simply 1/100 scale (the NG is user-appended) are similar to HGs. They don't have internal frames, and they often lack details. They are the cheapest among 1/100 scales, and MS kits released in NG/100 are from the non-UC series.
  • RE/100 (Reborn series) are "rebranded" 1/100 scale. They are similar to NGs that they do not have internal frames, but do have ample details. The kits released in this line so far are from the UC series.
  • 1/100 IBO. These kits come with simple internal frames and detailed armor parts. The articulation is rudimentary, but still good compared to other regular 1/100 scale.
  • 1/100 FM. Stands for Full Mechanics and replaces the 1/100 IBO full frame tag.
  • The Master Grade (MG) has an internal frame, often with intricate details and complex articulation mechanisms. Most modern MGs (2.0 and 3.0) have full inner frames, whereas older ones only have partial inner frames.
  • The Master Grade verKa. A distinct line of Master Grades designed, Engineered and Produced by Master Designer Hajime Katoki. The verKa line is also easily identifiable with its distinct white box.
  • Master Grade Extreme (MGEX) - The MGEX is marketed as a next-level Master Grade that goes beyond the detail of its predecessor. First in line is the MGEX Unicorn, which is marketed to have improved articulation, detail and houses an RGB LED lighting system along with a dedicated MS Cage. Next in line is the MGEX Strike Freedom.
  • GFF-MC and Metal Build. These are composite figures, with metal die-cast and PVC plastic parts. Though categorized as non-scale. these figures are based on 1/100 scale heights. Most are standalone figures, though some have swappable parts, like the MB Exia/R3. GFF-MC Stands for Gundam Fix Figuration Metal Composite. Up until recently, the GFF-MC line have all been UC MS, but the F91 is released as GFF-MC feat Metal Build, while the Wing Zero Custom is released as GFF-MC.
  • High Resolution Model (HiRM). This new line of metal composites is a hybrid figure/kit comes with a hybrid die-cast metal/plastic frame, and plastic armor parts still on runners, which gives collectors the chance to assemble the parts themselves. The first to be released in this line is the IBO Barbatos and P-Bandai Barbatos 6th Form. The Wing Zero and Red Frame Astray were each released a year after each other. The most recent release was the HiRM God Gundam, which were preceded by the Wing Endless Waltz and Astray Noir respectively.

1/60 scale and higher

  • 1/60 kits are just scaled up HGs/NGs, with no inner frames. These kits lack detail and with minimal articulation. There are only a few kits released in this line (like the Exia, Strike Freedom, Shining/God Gundam, Freedom, et al), in very low circulation.
  • The Perfect Grade (PG) line has plenty of parts owing to its size. Earlier PGs have very complicated frame assemblies (up to the GPO1/FB), with modern ones having a <simpler> yet robust frame assembly (starting from the Strike). The latest in the PG line is the Perfect Strike Gundam, which basically the PG Strike with Launcher and Sword Striker packs. 
  • The Perfect Grade Unleashed (PGU) - Is an upgraded PG, with a more complex frame and armor assembly as well as metal detail parts. The first in the line is the PGU RX 78-2.
  • 1/35 Jumbo Grade is really more like a scaled up HG, no internal frame and limited in articulation and detail.
  • 1/48 Mega Size. This line is simply scaled-up HGs, with very minimal articulation and detail. These are mostly display pieces.

SD Kits

SD or Super Deformed kits are Gunpla kits that are not based on any scale, but rather on deformed proportion as basis for cuteness, specifically having very large heads and comically anime eyes. They offer a very limited articulation and require much more attention for details and painting. To compensate for lack of detail, some SD kits have very large sticker pads included, while other SD kits have an extra gimmick not shown in their normal counterparts. One of the most common SD kits in Japan are based on the Plamo-Kyoshiro’s Musha Gundam line.

The most current iteration of SD kits is the SD Gundam EX-Standard (SDEX) which are based on the current Gundam models in SD size. They are cheaper to produce and have more articulation than the previous SD kits, though is more lacking in plastic production as some parts (especially in the limbs) are left hollow to compensate on its cheap cost.

Recently released is the SD Cross Silhouette series. These SD kits come with and can be assembled on a generic internal frame and allows builders to mix and match parts from different kits as well as set different proportions by using the Cross Silhouette frame.

https://cdn.store-assets.com/s/209038/f/639721.jpg
Source: https://www.ohmygundam.com.my/blogs/blog/gundam-size-comparison


Tuesday, January 26, 2021

PG EXia: Fixing a Very Small Broken Part

The PG Exia is one of my favorite snap builds, and was one of my most anticipated Gunpla purchases ever since it was announced. I did predict it was going to be released that year, and the moment I saw the announcement, I immediately got it on Pre-Order.

It's a clean, robust build, with a lot of improvements build-wise from its predecessor, the 00. Even without the ratchet joints that required screws, the PG Exia's joints are rather stable even with the amount of articulation and complexity of the frame build. The PG Exia is the third in Bandai's Gunpla Evolution Project, a series of highly-detailed kits which began the HGUC Zeta, then followed by the RG Unicorn.


But, like most kits, it is not without flaws, or at least, parts that are prone to breaking due to carelessness or heavy-handedness, both of which I am at one point or another. As per my original assessment when I was snap-building it, there are several sections and parts that, though engineered well in terns of fitting and assembly remains very much weak when compared with other parts in the kit. The front shin guard that is hinged at the base of the ankle, for example, is prone to breaking near the curved section if one isn't careful enough when doing open-hatch transformations. Suffice it to say, both shin guard broke at the same general location, which also makes this a molding issue, much like the other breaks I've had in other kits.

Open-Hatch gimmicks are cool, though this one is pretty useless 

Even though it's a Perfect Grade, one would expect that Bandai would make parts less prone to breaking by making parts or sections thicker, especially the connective pegs which can break even during the initial build. Some pegs are just 1.0mm in diameter, too thin for comfort, even though these pegs are encapsulated covers within other parts. They can easily break because they are too thin.

I had one such peg break while I was disassembling the arm section for cleaning and mod-fitting. The peg breaking is a non-issue,  since like I said, it's an encapsulated peg which inserted in a dual frame/armor section, so, it won't really matter if it's there or not. Being me, I pulled out the broken peg from the socket, it had enough root for me to pull lightly with a side cutter, and I cemented it back into place.

But, that's not the real reason for this post. For some reason, a part broke without me even realizing it was broken, until I was checking and disassembling the arm section. It's not even a crucial part, I was thinking of leaving it be, but I got that itch that won't go away (yeah, maybe it's allergies). The part is located behind the lower arm section (L7), and it was hardly noticeable since it was covered by the outer armor section, but, the more I look at it, the more it screamed at me to fix it. I tried ignoring it for several minutes, but the temptation is too strong.

The Sound of One Part Breaking...

So I gave in.  I planned nothing more but simply attach a small piece of 1.0mm PS sheet to the broken section, then reinforced the front plate with a thinner sheet of PS, which should serve as extra detail, and did the same detail to the other side (and later on, to its mirror twin). It was late. I was sleepy, and I had class the next day, so I laid it down to rest, hoping to never think about it again.

This should have been enough, BRAIN!

Unfortunately, that's not how my brain works. As soon as I woke up, my brain, which has a mind of its own, started bugging me about that small fix that looked incomplete. I had to rebuild that section, lest it bugs me the rest of the day. So, I started doing cuts here and there, reassessed the shape and how I would eventually go about it. The thing about this fix is, it wasn't going to be simple. Unlike other parts, this one is a complex shape that actually hugs the frame section it is connected to, so I had to rebuild it in two stages. The first stage involved having to cut a little bit on the top and filling it down so I can cement a piece of 0.5mm PS sheet, then reshape it as its mirror-side

Pitter Patter Pieces Splatter.

Stage two involved cementing a yet smaller piece or 1.0mm shaped PS sheet, then reshaped to mirror the other side.

Now THAT is what I call Plastic Surgery!

Each part of the stages took about 15-20 minutes for the cement to cure enough for the next section to be attached. Since this is a very small part, each attachment tend to be very delicate. It's a good thing I waited overnight, the cement in the initial fix was solid enough that any additional sections was easier to place without the entire thing collapsing. 

Elbow grease. Maybe literally.

There you go! With a few more dabs of cement and sanding, it should be barely noticeable as a fix. I won't need to put a peg anymore, as I have mentioned earlier, these pegs hardly support anything, since the main frame assembly are also pegged. But note that that lone peg on the right was the same peg I broke earlier.


Monday, January 25, 2021

Side Cutters: The Sharp Edge

Side cutters. We also know them as nippers, which are not unlike cuticle nippers that manicurists use to nip cuticles and dead skin from your fingers (hence why they are called nippers). A lot of people, especially those new to the hobby often use these tools the only straightforward way they can: cut the part from the gate flush and straight right away.

Not a nipper...

Whereas that is true in come cases, like cutting parts at the gate or runner section, cutting the excess gate from the part requires a little bit more finesse, and that is where the nipping comes in. A lot of people expect a clean cut from a sharp cutter, which can be true in some cases, but, it’s actually best to nip the nub slowly, especially thick gates, regardless of the cutter you are using. Cut improperly, you’ll get either a stressed surface (whitening) or a pit, which is a small section that gets cut beyond the surface of the plastic you are cutting.

There’s also a distinct difference between side cutters and diagonal cutters. A side cutter is called as such because it has flat-sided cutting edges (teeth blade profile) that ideally cuts flush (or perpendicularly), whereas a diagonal cutter has triangular profile and cuts at an angle.

Most wire cutters are diagonal, especially those used to cut thick wires because the triangular profile adds strength to the blade, but there are some wire cutters that have a flat side, designed mainly to cut thin to medium diameter and stranded wires (as you will see in my examples).

I collect tools, and cutters are no exception. I have several in my tool box, all of which I have used in rotation.

A cutter for every occasion

  1. Alexan Wire Cutter (PhP110/$2) - For me this is the most versatile and robust cutter in my collection. Since it’s designed for cutting thin and stranded wires, it can make short work of plastic runners. It can cut even the thickest and hardest runner quite easily, and can cut gates and nubs almost flush, especially when it’s new. I always have at least 2 of this at a time in rotation (currently, I have a 3rd on standby). It’s very durable and most economical considering its price point. This one is a good cutter for starters (especially students) but do not want invest on more expensive tools right away.
  2. 3Peaks (PhP150/$3) - This is one of the earliest cutters I’ve got. It can cut clean, but not necessarily flush, but is good enough as a general, all-around cutter. Its shape is similar to most side cutters.
  3. MTC-22 Side Cutter (PhP250/$5) - I call this one the Mother of all Side Cutters, mainly because of its size. At 6” length, it dwarfs all of the side cutters I have. It’s mainly designed for cutting thin to medium diameter copper wires, it can cut the thickest of runners and gates, but because it has a very large cutting head, is not really ideal for cutting nubs away, especially the smaller parts contained in tighter and narrower runner grids. I got it on a whim, but I use it to cut thick sheets, beams and runners when I do modifications and scratch-builds.
  4. Tamiya Side Cutter #1 (PhP950/$20) - This one can cut clean and is a good second all-around cutter.
  5. Tamiya Side Cutter #35 (PhP1200/$24) - Slightly more expensive than the #1, this one has a slimmer head (close to Godhand Ultimate) which can fit into smaller nooks and crannies. It can cut clean, and very durable.
  6. Godhand Craft Grip 120-S (PhP1400/$28) - Designed for smaller hands, the Craft Grip Series is made with thicker handles, but is nonetheless great as an all-purpose cutter. Its shape and blade is similar to the Tamiya #35, but has a thicker profile which makes it a lot more durable compared to its most expensive sibling, the Ultimate.

Now, I do have Nanye cutter (PhP400/$8), which even came with a pouch and a protective cover, but I’m so disappointed with it, I didn’t bother giving it a review (3Peaks was better and could cut cleaner, and it’s almost 10 years older). But, others seem to like it and even rave about it, so I guess you can go with that. But, for me, it’s not worth it for its price point, that I’d rather have 3 or 4 Alexan cutters and a 3Peaks cutter than a Nanye cutter. Alternatively, the Tamiya cutters are a better investment and more cost-effective than a Nanye.

Of course, there’s the overly-hyped Godhand Ultimate (PhP2300~/$46) which supposedly can cut so clean you can lick it, but, is so fragile, it can’t really serve as an all-around cutter, and at that price point, is not really an ideal investment. Godhand Ultimate’s greatest feature is also its greatest flaw: its sharpness is the reason why it’s fragile. But, I’ll probably get one just to have one, if I get the extra dough.

There are other cutters ranging from entry-level cheap to utterly expert-only expensive, of course, like Mineshima, Doyusha and Platz (medium range), as well as other non-name brand* models. Bandai, though late in the game has entered into the sidecutter market with its Bandai Spirits Entry-Level Cutter (P350/$7) and Buildup Nipper (PhP900/$18), the latter of which seems to be Bandai’s response to the Godhand series.

Bandai Spirits Build Up Nipper


Nevertheless, no matter what cutter you get, you will eventually end up doing more than just snap-building, as such, having a cutter that can cut clean is rather secondary. When you’ve come to that point that snapbuilding is no longer enough, you will have to file and/or clean nubs to prep the parts for painting. Personally, I don’t really bother doing a clean snap-build anymore, opting to keep a little bit of nub in most cases and removing nubs only when I decide to modify and/or paint, a practice that prevents the plastic from oxidizing any further beyond the nub.

(All prices indicated are estimates or average SRPs. This will be updated as necessary)


*Non-name brand simply means the brand is not well-known, or at least, not marketed as a Gunpla/Modeling cutter.


Sunday, January 24, 2021

Customized Paint Stands

Having acquired a lot more paints, among them, a few Armored Komodo paints, I find myself having the need to make another paint bottle stand, to organize the older and newer paints in larger bottles. I previously made one for my Vallejo paints, which is just enough for the ones I currently have on stock. I've seen nice prefab painting stations, but the cost is a bit prohibitive if not impractical for me, even before the lockdown.

A-10-SZHUN!

The new one will have larger receptacles which could fit bottle diameters of about 3.5cm. I have one Tamiya bottle that's about 3.8cm, but seeing that I won't be getting Tamiya paints anymore, I just stuck with the more conservative measurement.

Puzzle Pieces Paint a Pretty Picture

This is all made with 1.0mm sheets of White High Impact PolyStyrene. Just like previous one, which has smaller, 2.5cm receptacles, I opted to go with a 3.0cm height.  The real pain with this project is cutting the slots on the slats. I've made a few mistakes along the way, marking and cutting at 3.5cm instead of 3.7cm (which you can clearly see in one of the smaller slats. So, instead of cutting right away, I simply marked the slot positions so I can make corrections as needed. I've made two long slats, and eight short ones. When assembled, it's already structurally-sound on it own even without cement since most of the slots fit snugly.

Step? No. Step? Yes!

The rest is just like pie, simply building around the assembly. First, the bottom sheet is cemented to secure the slats into place, then the sides, doubling down to reinforce the assembly for a solid structure. To make sure the slats stay in place, I trickled thin cement on contact points, which should be enough to melt the surfaces and weld together when the cement dries and cures.

When the dog bites, when the bee stings...

The good thing about this, I suppose, is I can simply make another one, or a couple, as the need arises. I'll also make another tool stand, but I need to get the cheaper blue HIPS sheets from Jolis in España. Another great thing about this is it's modular, and I can build a paint and tool station and mount these individual stands on top of each other for a more organized work station, clearing the clutter on the mat.

From Chaos...
...to Ordered Chaos.


Thursday, January 21, 2021

SIN: Freehand Scribing

I’ve been using dymo tapes, as well as making my own scribing templates using PS sheets, but they’ve become a tad too tedious to use, especially with a lot of parts involved. I’ve also used my old college metal drafting template, but that too was a bit limited.

So I started practicing scribing freehand, which significantly simplified my workflow, opting to use straight-edges as a last resort for long line and complex curved surfaces. I also sketch panel lines on paper first and practice on thick board, and later on, scrap parts.

The Basic Tools

For those who are just getting their feet wet, you can always make your own tools. You can achieve good results even with just these tools with enough practice, especially if you are using guides.

  • Pencils - for sketching and planning the scribe lines. When I make a mistake or am not satisfied with the result, I can simply erase and start over. Penciling over initial scribe lines also makes the panel lines more visible on white and yellow parts.
  • Blunted/Chipped X-Acto Blades - I never or rarely throw away used blades since I can still use most of them for scoring and cutting most PS sheets. But I can also use these blades as scribing chisels. I convert chipped blades into 0.1~0.5mm scribers, while unchipped ones can be converted into 0.05~0.1mm scribers.
  • Needle points - Certain Hobby knife sets, like DAFA, also include needle points, but you can basically use any sturdy needle point, like compass needles, or anything long enough for you to hold, or at least, mount on a knife shaft or pin vise. Needle points can be used to scribe initial lines, as well as put corner points where angled lines meet.
  • Precision Screw Driver (not shown) - Those micro screw drivers used in eyeglass and cellphone repair can be sharpened and converted into 1.0mm (or wider) chisels. I’ve even converted one of my old Tamiya flat screw drivers into 2.0mm chisel, and it worked well enough for scribing basic panel lines.

Tools of the Trade

The Simplified Workflow

After sanding most of the surfaces that needed it to make it ready for pencils, I penciled in the panel pattern, then, I lightly scored the plastic using a blunt X-Acto blade with a broken tip, gliding over the pencil marks very carefully to make sure the resulting scribe line is straight as needed. I try to achieve close symmetry, but a little bit of asymmetry does make things look a little bit more interesting.

After the initial scoring, I re-scored the line, still with the same blunt blade for a deeper line, then after, flipped the blade and used the broad side of the broken tip to create the |_| panel line. For wider lines, I used the same blunt blade as a chisel to carve out a wider area. In some cases, I also use scribing saws for cleaner lines (0.2mm).

Side calf armor section of the Stein

Any excesses or burrs that creep out of the resulting line can be quickly sanded off and refined further by running the chisel a few more times in the line again. A folded high-grit sandpaper should smooth off any ragged edges, and a used, soft-bristle toothbrush should remove the accumulated dust.

The Sinanju's Side Booster:,Intitial scribing and painted

The Corner Conundrum

Most who do panel-line scribing for the first time would often be hesitant to do these lines, and it’s understandable, because they don’t want to screw it up, in turn damaging the part. Gunpla is expensive, and although scratches and scribe line mistakes (crooked lines) are easily fixable, most people would rather not go through the dilemma. So, there is such a thing as being too careful, as hesitation can lead to small mistakes especially when dealing with corners (gaps, overshoots and small curves)


Hesitation Corners
 
You can avoid these hesitation corners by marking the planned corners with a needle point, much like how way points are plotted on a map.
  • Pencil the panel line on
  • Mark the corners very lightly with the needle point
  • Scribe the initial lines
  • Finalize and sand

You can deepen and vary the widths as needed later on.

Alin, alin, alin ang naiba? Isipin kung alin ang naiba...
 
Duplicating Details

I usually just eyeball mirror details, but, I also do cheat from time to time. Masking tape is always a good implement to have, and is rather simple and straightforward to use. When mirroring a panel line detail from one section to another, I tape over the scribed lines, pencil out the detail on tape, attach the tape to a piece of PS sheet (there’s a tongue-twisting pun there somewhere) then cut the sheet, which becomes a template for the mirror side. This is the same technique I use with PS plating, using precut sheets as templates.

Masking Tape Magic
 
Tool Upgrades

After a while, I realized that even if I could get good results with my makeshift tools, they are still a bit limited when it comes to the variety of widths I can achieve. Blunt and chipped blades also become a bit uneven over time, so I needed a tool upgrade. 

There are several chisel options available, from the practically affordable (Wave HG Chisels) to the uber expensive (BMC), but they work the same way and will give you similar if not the same results. Ultimately, results will depend on you and how you use these tools.

I got a Wave HG set which includes four chisel bits (0.1, 0.2, 0.3 and 0.5mm) and a handle. Seeing that I’ll be using the 0.3 and 0.5mm bits, I opted to get additional 0.3 and 0.5mm bits, including 0.8 and 1.0mm, as well as extra handles to minimize having to replace bits while I work, which can also help avoid damaging the chisel bit.

The Wave HG Chisel set is a good starter set for scribing

With these tools, I can gradually widen the panel line width, which prevents the surrounding plastic from getting micro-cracks, which later leads to crooked-looking lines, much like how one gradually drills into certain materials, like ceramic tiles, with smaller to larger drill bits to avoid damaging the tile.

Wave HG Chisels are the most affordable high-end chisels
The Final Result

With some trial and error, I was able to refine the technique. Strangely enough, gliding the blunt blade to score the initial scribe line is more challenging on a flat surface than it is on a curved one. In some cases, especially with long lines on flat surfaces, I still use a straight edge to scribe the initial line.

Prefinal Scribe Lines

After proper sanding, priming and painting, these added details should look as if its part of the original kit.

Mirror, Mirror on the wall...

Here's a nifty step-by-step video of the process:


Tuesday, January 19, 2021

The Importance of Sanding and Priming

Here's one of the main reasons why sanding is a necessary step before any paint job, aside from removing nubs. Though most surfaces look smooth, there will always be indentation on the surfaces caused by underlying support struts shrinking the plastic surface it’s supporting unevenly, forcing the surface it is connected to to become depressed. There are also plastic swirls, spots where plastic from opposite gates meet. 

Left: light sanding shows surface imperfections. Right: fully sanded surface

Ignoring these depressions and imperfections would ruin an otherwise fine paint job, since paint, especially gloss finishes, would make these depressions more visible. That's why for most, skipping sanding is a no-no. In fact, most people, like myself, enjoy the Zen of Sanding, since it allows me to focus. A botched-up sanding job (like, oversanding, which can remove fine details that can be difficult to redo) could also ruin it.

Ugly paint swirls are caused by primer/paint reacting to the Gunpla's protective coating

Some modelers employ the use of putty, which they file and sand later on to flatten and/or smooth out the surface, but, since I don't use putty, I opt to directly file the surface over, then sand it smooth. Of course, this works for shallow depressions. For deeper depressions and/or pit damage (the hole created by force-pulling a nub with a dull or shallow cutter), I cement a shaped strip of polystyrene sheet, wait for a half a day or so, then file and sand smooth. Sanding prepares the surface you are working on for priming.

For resin kits, resin glue or superglue does the job. Some modelers make their own resin putty by combining superglue and talcum powder.

In some cases, light sanding with medium to high grit sandpapers would be enough, but, for majority of nub removals and heavy modifications, progressive sanding is a good practice.

Priming, on the other hand, provides a smooth surface for base paints to adhere to. Priming also allows you to spot problematic areas, like micro-scratches, either natural or introduced during sanding, and can become fillers for light scratches. Certain primers, like Bosny paints, adhere to most surfaces almost readily (whether they are sanded or not), some primers do require a well- sanded surface to adhere to. 

It's Prime Time

Light priming is ideal for any paint job that requires multiple layering, like candy tones or gradient effects that will be later top-coated. A full coat of primer is best for single, or flat-color schemes, or for hand brushing.

The Newbie Stash

Source This is a collection of specific guides for reference in Gunpla Building and Modeling in General.  • Gunpla™ and Modeling Terminolog...