Sunday, August 8, 2010

The Unicorn, Torsofied!


Adding the torso armor on the Unicorn was a bit tedious, mainly because I had to consider the articulation range I've given it. Incorrect armor placement will render the modification useless, so I had to build the armor in layers as well. I've test fitted the entire setup to gauge the proportion of the torso to the rest of the body.

Posted Image

Posted Image

Posted Image

The modifications are far from done. Like this, the Unicorn's waist looks like that of Barbie's, so I will have to add volume later. The mod added a about 15mm and balanced the overall proportions. Even at Destroy Mode, it's still smaller than the Angelus.

Posted Image

---------

Also, New Ice Queen Photos added to the Gallery.

Friday, August 6, 2010

The Itch is now a RASH!


(And this tutorial is ALMOST becoming a WIP).  I thought once I've done the knee mods I'll be done and over with this thing, but modifying the knees and putting it in kneeling position exposed the rather obvious proportionality flaws of the Unicorn (the main reason I didn't like it back then, just looking at the box art). Even at Unicorn mode, the lower legs are too long and the thighs are too short. Even putting the thighs in Destroy mode didn't compensate for the difference.

Posted Image

Thursday, August 5, 2010

The Itch. Par Deux...

As I contemplated the "simple" modifications I've made on the Unicorn's knees, what I told myself bugged me to no end. I HAD TO extend the leg/knee joint to further increase the angle.

I thought of two things I can do; modify the already modified knee case by extending it downwards and giving it a new swivel point. It seemed easy enough, but the gears in my head somewhat got stuck on an obvious drawback to the solution; the extension will be unstable.

So, I have no recourse but to perform more plastic surgery on the leg connection itself. The solution is simple, but the process on how to do it wasn't because I would have to cut through enough material for the pla plate rebuilding to hold on to the ring that the knee case attaches to, and maintain enough area at the base. Simply cutting it laterally won't do it considering the section where the knee psychoframe slides, and I pondered for an hour what to do because I would have to "cut deep." I also hope my measurements are enough to give me at least 20 degrees more.

I cut through the base laterally with a thin saw (transparent white) so I can get the ring intact with enough material underneath (red). I then sawed off the rest of the part along the base line (blue), but this can only be fully removed by drilling the base of the cut (yellow).


Wednesday, August 4, 2010

When I Have an Itch...


...I Modify.  In this case, that wretched Unicorn vKa knee that had so limited an articulation they might as well have kept the darned thing in a fixed position.  This thing has been bugging me ever since I got that second half-built Unicorn.  After the ZeroGunz Unicorn/Astray Group Build officially started, I asked Rayloke if he planned to do any articulation modifications to the Uni's knees.  He can, and it is indeed possible, even from my perspective, but, he hadn't any plans to pose his build in a kneeling position, so, he didn't do any.

Even the OVA/HD version, which sported a darker ABS frame, was a disappointment, as if the "150%" increased articulation angle (from 60-75 to a full 90 degrees) was a big deal.

Armored Hindrance.  Assessing the knees (I have been doing this on an off for quite some time now), I've identified the obvious problem spots with the armor attached.  Those "calf fins" would definitely have to me modified.  But, instead of cutting it short, I decided to cut the upper section and make the fins "flay" out, like the twin rudders of the F22 raptor.  The protruding central knee will also have to be modified for it to move inside the flayed fins and so I won't have to flay the fins so much.


Sunday, August 1, 2010

Rayloke's SappFire Unicorn


Rayloke of ZeroGunz is probably one of the modelers I have seen so far who make subtle but effective modifications.  He recently finished his Unicorn/Astray Group Build entry and I'm astounded at how he made the Unicorn THAT likable.

I don't like the Unicorn that much, in any mode, although the untransformed Unicorn Mode grew on me.  Which, for all intents and purpose, will make you wonder why I got two of them MG buggers and two of those flimsy stands.  My main reason is I got both MGs cheap.  I bought the first one, still unbuilt to this day from another modeler/collector for only PhP 1900 (depending on the Yen's value, that's approximately 3500 Yen, a huge discount from the original price of 5000 Yen).  Then I got the second one, half-built at 1400), from the same modeler I got my second Sinanju from (this guy is CRAZY).  But I digress.

Here are a few pictures of his modifications.


You can see the whole progress of his work at ZeroGunz, and the completed version HERE.

Angelus Rising Part VIII: More Quick Fixes

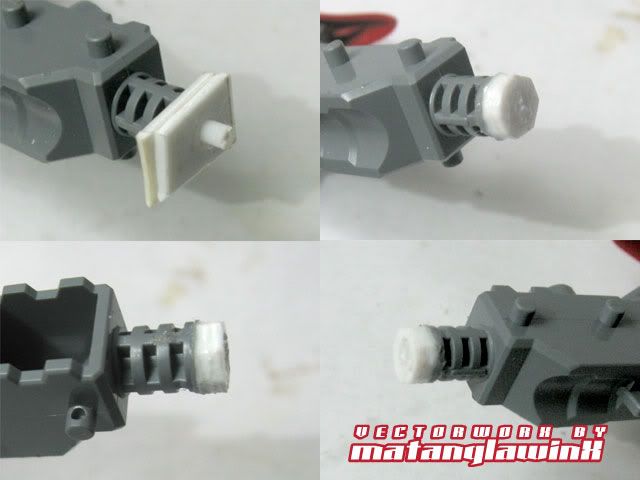
Like I mentioned in the previous update, the ankles were a bit unstable due to the extension made to the hole section of the assembly, so I decided to extend the peg section as well with the core method.

Using a 2mm bit, I drilled a hole through the center axis of the peg, dabbed a bit of cement over the hole and inserted a 2mm beam which extends about 3mm over the length of the peg.  I then sandwiched two pieces of apt-sized 2mm plaplates, drilled a hole through them as well, and laid that over the peg/core assembly, cementing the core to the plates in turn. 


After 10 minutes or so, I trimmed the excess off with the side cutter, then filed it into shape.


The Newbie Stash

Source This is a collection of specific guides for reference in Gunpla Building and Modeling in General.  • Gunpla™ and Modeling Terminolog...