...begins with a single knife nick.
More than two years ago, I built my
PG Gundam Astray Red Frame as soon as I got home with it. It was one hefty snap build, taking most of the night and a few hours of the next day to complete. I thought that was the end of it, as I never really considered I'd be putting a Perfect Grade under the knife.
As in
never.
 |
| What did you do with my birdie? |
But, if I consider my track record, I should really stop saying never, because, when I restarted collecting kits, I told myself
I'll never paint, modify, scratchbuild or join competitions, in that order. Little did I know back then that all it took was a small knife nick, and a
small gush of blood to change all that. Instead of shying away from it, I began scraping the plastic's surface, something I handled rather delicately before, to remove the glossiness of it. After that, as if a switch suddenly toggled on, I began looking for Gundams online, and registered at my very first Gunpla forum,
ZeroG.
I discovered (or more apropo,
re-discovered) skills I didn't think I have. I liked making and building stuff up when I was a kid, often
making my own toys, and even did a few "sculptures" during my teens, but, I never really got to connect those skills, along with my design background, with Gunpla until that fateful knife cut when I was simply cutting the nubs away from my
MG Zeta Plus A1.
So began my journey. The first ever modeler that really caught my eye was
Erix93, with his custom Exia. His modifications on the kit was superb, and back then, I didn't even believe I would be able to cut plastic the way he did. Several superficial and rather deep knife cuts later, I was doing what I thought was unthinkable; I was building things from scratch, and mangling Gunpla in a way that makes any newbie squeamish.
To cut a long story short, I "met"
DC23 online and saw his skills as well. He and I hit it off, and, as history goes, are now co-admins of
TheMACForums. It was him who encouraged me to join the 2009 BAKUC, but it was me who made the
boneheaded move of working on the Astray and turn it into The Ronin.
Don monitored my progress, and have given me advise here and there, especially on the merits of static mods, since, judges won't see the point anyway. But, I'm pigheaded in that regard that it was making articulated and functional mods that actually drive me to do modifications at all. The deadline came and went, and the Ronin lacked arms, and with it, a very, VERY poorly done base.
 |
| A kindergartener could do better than that, you know... |
Suffice it to say, I was half glad I didn't finish it then. I knew I could do better. I know I would do better.
Fast forward. A couple of months ago, I decided to reboot the Ronin, although I kept quiet about it until I had most of the armor redesign covered. I didn't do a WIP shoot, mainly because it takes too much time to set up one shot after another, especially with step-by-step shots. So I toiled in silence.
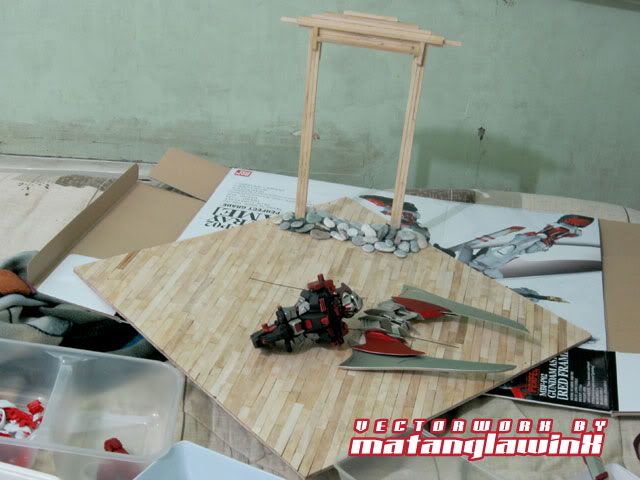
Keeping my experience the previous year in mind, I was determined to finish the Ronin in time for the GBWC. I made sure all modifications were done and painted, but, like two years ago, I still had that dilemma of the dreaded diorama.
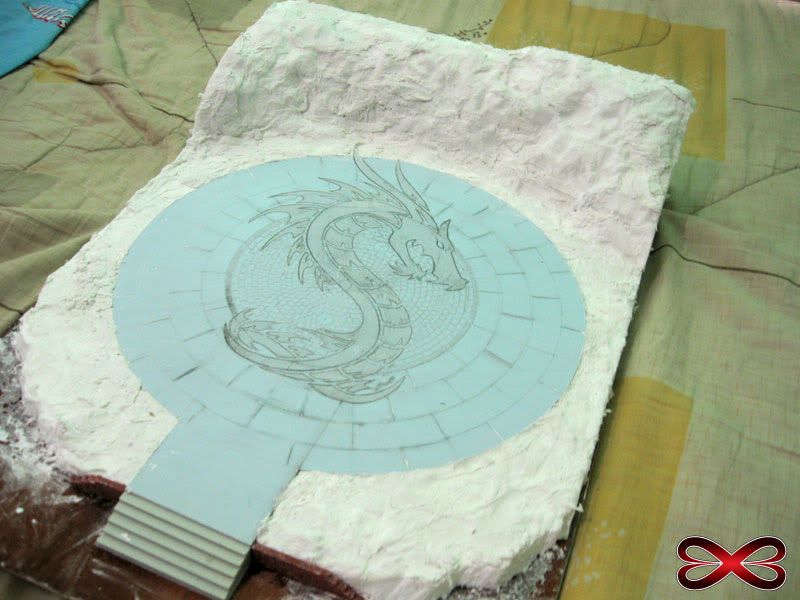
I'm not a diorama guy. I primarily focus on the kits I work on, and I basically am satisfied with modifications and scratchbuilds, often ignoring the importance of a good paint job altogether. But Don's wisdom on the matter is spot on: A well-made kit is nothing without a well-thought of and properly executed diorama. This time around, I kept the concept of the Shrine, but changed how I'd execute it. I used layered styrofoam lined with tissue paper drenched in plaster of paris, with patches of plaster on certain sections. The only problem that remained was, as usual, time.
I can't begin to describe what was going inside my head as I reached the last 24 hours or so, and, aside from the Dragon YinYang etched on HIPS, I still didn't have a diorama to speak of, no to mention I had a gig the night before my submission.
Before I left for my gig, all I had was this:
 |
| Better, like, a masterpiece made by a first grader... |
With my brain leaking energy like Chernobyl, I headed out to my gig visualizing how the dio would look like. Pressed for time, after having a quick dinner and posting a final update (which actually shaved almost 3 hours off my available time), I primed the diorama (which was still a bit moist with the glue still curing) and worked on the rest of the Torii gate, and other small parts I still needed to paint while the primer quick dried. The rest of the night, I painted the Dragon YinYang with Vallejo paints, a must for hand painting. I made small and big screwups every now and then, but I was primed not to be deterred even with the little time I had left. I started adding the faux grass and pebbles, getting frustrated with how thick Shelwood glue is that the grass and pebbles stick to my hand as I pat them down the plaster, but knowing it will hold well when it dries.
I slept for an hour and a half, barely enough time to recharge, but enough for my wits to return, and enough time left to work on the trees. I was amazed how drastic the change was when I put the faux trees one by one. I couldn't believe my eyes even if I have seen this scene a million times in my head. Glue still drying, and details lacking notwithstanding, I completed the diorama I drew in my mind.
I didn't have time to take photos of the diorama and the complete setup with the Ronin. I disassembled the kit in major sections and packed them all in one of my RFA clear parts boxes. I planned to travel light, owing to the fact that I was tired, and I didn't have a car. I would have to take the cab on my way to Robinsons, and would have to carry the still-drying diorama by hand.
It was my birthday, as such, though I no longer believe i luck, I somehow felt lucky. Being me, though, I've learned it's better not to expect anything, especially with the skill levels of the people competing leveled-up quite significantly, which was not the case several years ago.
There was still a few people who lined up at the submissions table when I got there. Most of the
MAC peeps have already submitted their masterpieces and were simply hanging around to see the other entries being set up.
While I was setting the Ronin up, I distinctly heard several people calling it by name; "
Uy, 'yan yung Ronin." Unlike last year, I was rather conscious of what I was doing then, lest a repeat of it happens yet again. I shrugged of mine own distracting thoughts and proceeded with my set up. I was able to talk with Mike Acosta aka Bulastog, with his Impulse Buster and the Ronin side-by-side.
So here it is, The Dragon Ronin and the Shrine.


 |
| This specific photo courtesy of JoseSabale.com |
So ends this journey, and another to begin, probably soon. I'd like to personally congratulate all the winners in all categories, especially
Fil Dimaano for bagging 2nd place, and
Mike Acosta, who will represent the Philippines at Hongkong this December.
 |
| Photos Courtesy of DC23 and Wuji |